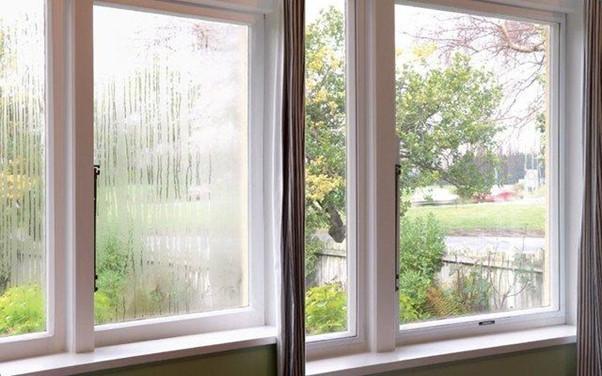
DIY Double Glazing with Insulation Film
Window insulation film works on the same principle as standard double glazing by creating a layer of still air in front of the glass that acts as insulation. DIY window insulation kits consist of clear plastic film for attaching to wooden window sashes or frames using double-sided adhesive tape. They cost a fraction of the price of double glazing yet offer good performance in reducing heat loss and condensation in your home, as well as preventing your sills and window dressings from going mouldy. You can pick up a kit from your local Mitre 10 or Bunnings.
Window insulation film is only designed to last one season, but it may remain intact for several years if your windows are in good condition and the film is undisturbed. Just be aware that adhesive tape used on the film may leave a stain if you leave it on for longer than one season.
Tips for installing
Installing DIY window insulation film is relatively easy – you only need a pair of scissors and a hair dryer.
• Make sure your window frames are dry and the paint is in good condition to avoid condensation forming inside the air gap.
• For wooden windows, applying a bead of sealant like silicone along the glass edge will further reduce the risk of moisture creeping into the air gap.
• Make sure your window pane is clean and streak free before putting the insulation up.
Step 1: Clean the Window
Clean the window thoroughly with an ammonia-based window cleaner and wipe it dry using a squeegee. Make sure that all of the window cleaner is wiped off, as it will dissolve the adhesive on the window film.
Step 2: Wet the glass with a light spray of water and baby shampoo
Fill a spray bottle with water and add a couple of drops of baby shampoo. Spray the mixture onto the window. This mixture helps the film stick to the window but still lets you slide the film around so you can fit it properly into the corners before the mixture dries.
Step 3: Measure and trim the film to size
Measure the window to see how large an area you need to cover, allowing at least two centimetres overlap for all four sides. Roll the window film out onto a flat horizontal surface and trim to size. Before you put the film on the window, start peeling the backing off the sticky side of the film. Use masking tape on both sides of one corner to get the peeling started.
Step 4: Put the window film onto the window
Once you’ve peeled off the top five to ten centimetres of backing, move the film up to the surface of the window. Start by putting the top two corners in place. Once the film is sitting in a good position you can slowly start to take the rest of the backing off.
Step 5: Remove the backing from window film as you go
Slowly peel the backing off in stages. Use a squeegee to flatten the film out onto the window as you go. Start the squeegee in the centre of the window and push out to the edges. As you work down the window, use the spray bottle to keep the surface as moist as possible. It will give you a much smoother finish.
Step 6: Remove the air bubbles from the window film
Once the squeegee has got the larger bubbles out, use the small plastic scraper to remove any smaller bubbles. You can work out any small pockets of water at the same time. Whatever small amounts of moisture are left will work with the adhesive on the film to create a bond to the window.
Step 7: Give the window film a final trim
When all the bubbles are out, take a sharp blade and give the film a final trim at the edges of the window. Once you’ve trimmed the edges, give the film one final scrape with the small plastic scraper. Tuck the corners in as hard as you can, squeegeeing towards the outside, working out the last remnants of water.
Remember Curtain Clean can help with those mouldy curtains, give us a call on 0800 579 0501 to find your local shop.
We would love to see or hear about your finished projects if you give them a try, please get in touch and let us know!

Poll: Are our Kiwi summer holidays helping us recharge, or holding the economy back? ☀️🥝
There’s growing debate about whether New Zealand’s extended Christmas break (and the slowdown that comes with it) affects productivity.
Tracy Watkins has weighed in ... now it’s your turn. What’s your take? 🤔

-
73.2% We work hard, we deserve a break!
-
15.7% Hmm, maybe?
-
11% Yes!
Brain Teaser of the Day 🧠✨ Can You Solve It? 🤔💬
How many balls of string does it take to reach the moon?
(Peter from Carterton kindly provided this head-scratcher ... thanks, Peter!)
Do you think you know the answer? Simply 'Like' this post and we'll post the answer in the comments below at 2pm on the day!
Want to stop seeing these in your newsfeed? No worries! Simply head here and click once on the Following button.

Celebrate in Style: Craft Your Own Decor with Testpots
Create handcrafted celebrations using Resene testpots. Find out how to create your own with these easy step by step instructions.


 Loading…


