How to Clean a Burnt Pan — 5 Methods Tested
Ever wonder how to clean a burnt pan? See what happened when we put different cleaning methods to the test on our dirtiest skillets.
Whether you burn dinner completely or your pans get dirtier and dirtier over time, eventually you’ll need to have a scouring session at the sink. And for this, the quicker the better! For this reason, we put five methods for cleaning a burnt pan to the test. Keep reading to learn how to clean a burnt pan—and see what methods are most effective.
Is a burnt pan ruined?
In most cases, no! A burnt pan can be revived with our cleaning methods below. If all else fails, or if the pan has endured multiple years of heavy use and never seems to get clean, it may be time to part ways with it.
The Testing Method: In an effort to make sure this guide gives you the most accurate results, we put some parameters in place for this skillet scrubbing experiment. All pans tested were made of stainless steel and scorched with the same combination of foods—cheese, eggs and grape jelly.
If the method recommended soaking, we allowed each pan to soak for up to 15 minutes, checking at intervals of 5 minutes and documenting when the charred remains began to lift with ease. We also limited any extra “active scrubbing” to 10 minutes because honestly, who wants to scrub a pan for longer than that?!
Ratings: Each method is rated on a scale of 1 to 5. Ratings were awarded based on how long each technique took to work its magic, how much extra elbow grease was required to remove the burnt-on food and the overall effectiveness in the cleaning process in terms of how much mess remained on the skillet after cleaning within our set parameters.
Cleaning Techniques for Greasy Skillets: Warning: Before cleaning your pans, test the method on a small, inconspicuous portion to ensure it won’t damage the surface. The methods below are intended for stainless steel cookware and not those with non-stick coatings.
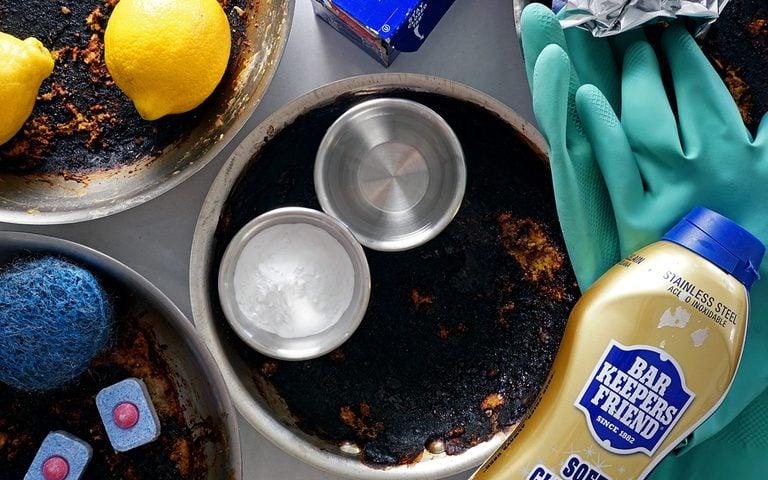
Tools and Supplies
Bar Keepers Friend: We tested Bar Keepers Friend for one of our cleaning methods and the results were impressive. It’s a household cleaning product everyone should have in their cupboard since it can be used on a variety of surfaces like stainless steel, ceramic and more. It’ll be your new cleaning best friend in no time.
Dishwashing gloves: Though all of our testing methods require less scrubbing, some scrubbing is necessary. Keep hands dry and clean with these versatile dishwashing gloves. We love that it features a non-drip catch cuff and that they can be used for washing dishes, cleaning the bathroom and everything in between.
Sponges: It’s always a good idea to have a stockpile of sponges on hand for everyday household cleaning. When it comes to cleaning kitchen appliances or cookware, opt for non-scratch sponges. They’re durable enough to get burnt food residue off, yet gentle enough that they won’t scratch or tarnish your best gear.
Method 1: Baking Soda + Vinegar
Benefits: This method uses affordable pantry items most people have on hand.
How It Works: Fill your dirty pan with equal part water and vinegar. Bring the mixture to a boil and then add 2 tablespoons of baking soda. Remove from heat and let soak for up to 15 minutes. Discard the liquid down your drain and then use a sponge or scouring pad to scrub away any remaining burnt-on bits. If spots remain, apply a paste made of baking soda mixed with a little water and let sit for a few minutes before scrubbing again.
What Happened: After just 5 minutes of soaking, we noticed some charred bits starting to float to the surface! However, we opted to let this one continue to soak for the full 15 minutes since it seemed some stubborn bits were holding fast. After rinsing and 10 minutes of heavy scrubbing with a scouring pad we were able to lift most of the charred, burnt-on food. A follow-up application of baking soda paste was definitely needed and further scrubbing was essential to lift the remaining debris. Rating: 3/5
Keep reading: www.curtainclean.co.nz...

Scam Alert: Fake information regarding December Bonuses from MSD
The Ministry of Social Development is reporting that fake information is circulating about new ‘December bonuses’ or ‘benefit increases’
If you get suspicious communication, please contact Netsafe.

Today’s Mind-Bender is the Last of the Year! Can You Guess It Before Everyone Else? 🌟🎁🌲
I dance in the sky with green and gold, a spectacle few are lucky to behold; I’m best seen in the south, a celestial sight—what am I, lighting up the New Zealand night?
Do you think you know the answer? Simply 'Like' this post and we'll post the answer in the comments below at 2pm on the day!
Want to stop seeing these in your newsfeed? No worries! Simply head here and click once on the Following button.


 Loading…


