Make a Living Wall
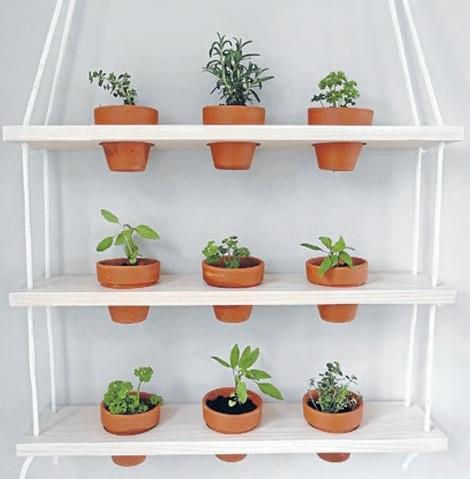
If you enjoy growing your own potted plants and would like a stylish way of displaying them inside the home, then this month's project could be just what you need. I've been admiring living walls and hanging gardens for some time now, and decided to create an achievable small-scale version to house small pots and fresh herbs in my kitchen. These shelves are affordable and easy to make, and ideal for apartments and smaller homes without much garden space.
For this project you will need:
• 1 length of untreated pine 20mm thick and 120mm wide
• Hand saw or skill saw, sandpaper
• Drill with 72mm hole saw drill bit and 7.5mm drill bit (for 7mm rope)
• 9 x 9cm terracotta pots
• White synthetic general purpose rope 7mm x 10m, 8 x white plastic cable ties
• Resene Colorwood Whitewash, speed brush or synthetic paintbrush
• Various herbs or small plants
Step one: Cut your length of pine into three pieces, each 600mm long. You can do this with either a hand saw or a skill saw. Once cut, give them a sand.
Step two: Measure out the placement of your holes that will hold the terracotta pots. I spaced mine out at 150mm centres. Repeat these markings for all three lengths of timber.
Step three: Using a drill with a hole saw attachment, cut out 72mm (D) sized holes to fit your terracotta pots. I practised first on a spare cut of timber I had lying around, to make sure that the hole I was drilling was the right size. For my 9cm pots, I found that 72mm ensured a good fit. Tidy up each hole with a light sand.
Step four: Now you need to cut the holes for your rope. Measure in 20mm from each corner and mark your drilling spot. Use a 7.5mm drill bit to make one hole in each corner (the size drill bit you use will depend on the thickness of the rope you are using to hang your shelves – adjust accordingly). Repeat for all three lengths of timber.
Step five: To achieve a fresh, clean look I used Resene Colorwood Whitewash interior wood stain. There are lots of colours to choose from, so you could pick whichever best suits the timber you are using and where the finished project will be hanging. I applied two coats of Whitewash using a speed brush, or synthetic brush.
Step six: Cut your rope into four equal lengths and thread each length through the corner holes of your shelves starting from the bottom. Tie each length of rope into a knot on the underside of the bottom shelf, so the bottom shelf rests on these knots.
Step seven: Adjust the placement of your shelves until you get them evenly spaced. Make sure you allow room for the pots to sit in the shelves, and room for your plants to grow of course. I spaced my shelves at 200mm apart. Secure the undersides of your remaining shelves with cable ties, they are a good solution because they aren't hugely visible and they don't budge. Trim the long ends of the cable ties once in place.
Step eight: Add your pots and plants, and hang in your chosen spot. Make sure that you use hooks that can safely take the weight of your shelves.
DIY with pictures: www.curtainclean.co.nz...

Fundraining for Bowl Cancer
Hi,
This February, I am taking part in Move your Butt for Bowel Cancer and will be conquering 200km for the 100 Kiwis who die from bowel cancer every month.
My goal is to raise funds for Bowel Cancer NZ to support patients, raise awareness and fund research to beat bowel cancer.
Please sponsor my challenge and support my efforts to save Kiwi lives.
To make a donation, simply visit my personal fundraising page below:
www.moveyourbutt.org.nz...
Thanks so much for your support.
Roydon
Poll: Should the government levy industries that contribute to financial hardship?
As reported in the Post, there’s a $30 million funding gap in financial mentoring. This has led to services closing and mentors stepping in unpaid just to keep helping people in need 🪙💰🪙
One proposed solution? Small levies on industries that profit from financial hardship — like banks, casinos, and similar companies.
So we want to hear what you think:
Should the government ask these industries to contribute?

-
59.8% Yes, supporting people is important!
-
25.8% No, individuals should take responsibility
-
14.4% ... It is complicated
Poll: Could having a bigger university presence bring new opportunities and energy to the Bay of Plenty?
As reported in The Post, the University of Waikato is planting roots in Tauranga as it works on “ambitious plans” to grow its Durham St campus. The goal? To see Tauranga recognised as a true “university city.”
We want to know: Could having a bigger university presence bring new opportunities and energy to the region? We’d love to hear your thoughts!

-
66.7% Yes!
-
33.3% Nah
-
0% Mmm, let's wait and see


 Loading…