DIY Fabric Headboard
You’ll need:
• Upholstery weight (ideally) fabric (Spotlight or your favourite store)
• Batting - I used an extra thick batting, be sure to get the width you need to cover your plywood or card
• Plywood or cardboard (local hardware shop or repurpose something lying around)
• Staple gun (& staples!)
• Heavy duty mirror/picture hanger (we recommend Hangman Heavy Duty Mirror and Picture Hanger from Mitre 10 but you can use whatever suits you!)
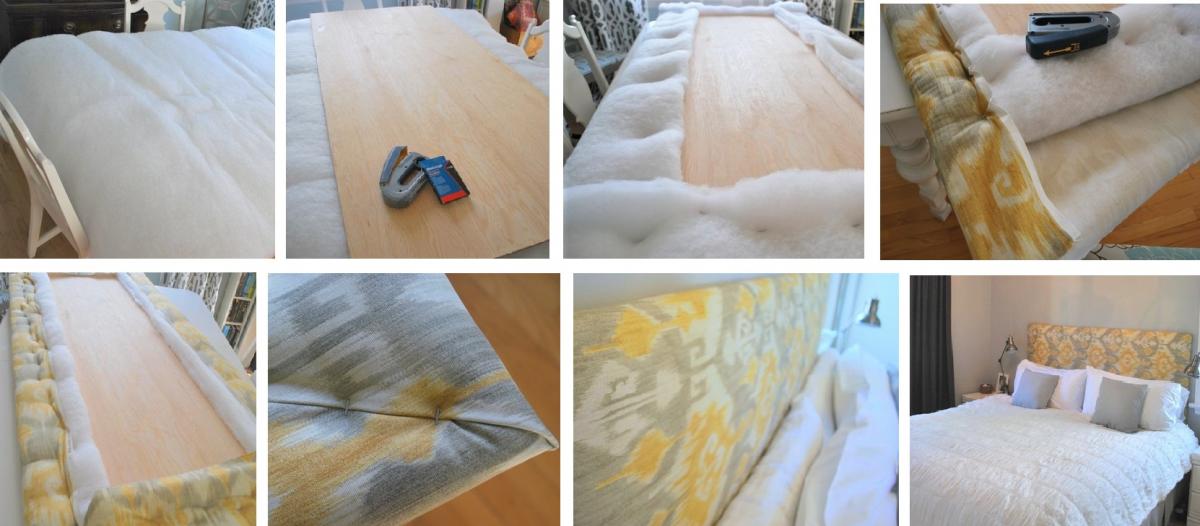
Step 1. After laying the batting out on my tabletop, I put my sheet of plywood on top. The size of your plywood will depend on the size of your bed. Wrap the batting around the plywood and start stapling it down with a staple gun. Just staple your way all around the board. Super easy.
Step 2. Once the batting was secured, I laid out the fabric with the patterned side down. I gave it a quick ironing to get out any wrinkles before starting. After placing my plywood on top of the fabric, it was time to start stapling the fabric. I started off by doing the two long sides. I made sure to pull it tightly as I was going so that it wouldn’t be too loose in the front.
The corners are the part you want to be careful with. My technique (and I’m not sure if this is the “right” way or not, but it worked) is to approach it like I was wrapping a present. I get one side stapled, and then fold it in to the un-stapled side. Then I bring that piece up and pull it really tightly and staple along the seam. It takes a bit of practice, but I would just do it a few times until I got the perfect seam and then staple ‘er down.
Step 3. Now came the tricky part of actually hanging it. We wanted to attach it directly to the wall rather than to our bed. We searched around and finally came across a Heavy duty mirror / picture hanger (Mitre 10, Bunnings probably has similar) Simply mount one track on mirror or picture, then install the wall track with included anchorless fasteners.
We’re really happy with how it turned out. The colours are just right and it’s nice to bring another textile into the room. Plus, it makes our basic bed look about a million times nicer and more expensive!
Full tutorial with pictures: diyshowoff.com...
🧩😏 Riddle me this, Neighbours…
I am an odd number. Take away a letter and I become even. What number am I?
Do you think you know the answer?
Want to stop seeing these in your newsfeed? No worries! Simply head here and click once on the Following button.

Have you got New Zealand's best shed? Show us and win!
Once again, Resene and NZ Gardener are on the hunt for New Zealand’s best shed! Send in the photos and the stories behind your man caves, she sheds, clever upcycled spaces, potty potting sheds and colourful chicken coops. The Resene Shed of the Year 2026 winner receives $1000 Resene ColorShop voucher, a $908 large Vegepod Starter Pack and a one-year subscription to NZ Gardener. To enter, tell us in writing (no more than 500 words) why your garden shed is New Zealand’s best, and send up to five high-quality photos by email to mailbox@nzgardener.co.nz. Entries close February 23, 2026.

Feilding Repair Cafe
The first Feilding Repair CAFE for 2026 is on Saturday Feb 21 from 10am until noon. The last fix is taken at 11.45am.
We are a team of specialist volunteers who will assess and possibly mend your broken household and garden items. If you can carry or wheel it in we're willing to have a look and see what can be done. Items made of wood, metal, plastic, fabric, ceramic, paper are all considered - we also have a knife and tool sharpener and a jeweler available. You can find us at the Senior Hub 14 Bowen St Feilding .


FEILDING REPAIR CAFE final 2026 poster Feb- April.pdf Download View
 Loading…