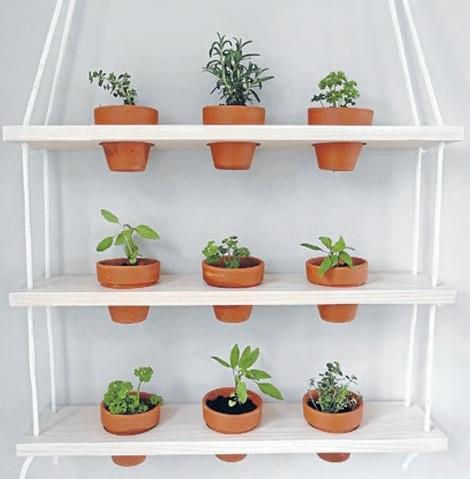
Make a Living Wall
If you enjoy growing your own potted plants and would like a stylish way of displaying them inside the home, then this month's project could be just what you need. I've been admiring living walls and hanging gardens for some time now, and decided to create an achievable small-scale version to house small pots and fresh herbs in my kitchen. These shelves are affordable and easy to make, and ideal for apartments and smaller homes without much garden space.
For this project you will need:
• 1 length of untreated pine 20mm thick and 120mm wide
• Hand saw or skill saw, sandpaper
• Drill with 72mm hole saw drill bit and 7.5mm drill bit (for 7mm rope)
• 9 x 9cm terracotta pots
• White synthetic general purpose rope 7mm x 10m, 8 x white plastic cable ties
• Resene Colorwood Whitewash, speed brush or synthetic paintbrush
• Various herbs or small plants
Step one: Cut your length of pine into three pieces, each 600mm long. You can do this with either a hand saw or a skill saw. Once cut, give them a sand.
Step two: Measure out the placement of your holes that will hold the terracotta pots. I spaced mine out at 150mm centres. Repeat these markings for all three lengths of timber.
Step three: Using a drill with a hole saw attachment, cut out 72mm (D) sized holes to fit your terracotta pots. I practised first on a spare cut of timber I had lying around, to make sure that the hole I was drilling was the right size. For my 9cm pots, I found that 72mm ensured a good fit. Tidy up each hole with a light sand.
Step four: Now you need to cut the holes for your rope. Measure in 20mm from each corner and mark your drilling spot. Use a 7.5mm drill bit to make one hole in each corner (the size drill bit you use will depend on the thickness of the rope you are using to hang your shelves – adjust accordingly). Repeat for all three lengths of timber.
Step five: To achieve a fresh, clean look I used Resene Colorwood Whitewash interior wood stain. There are lots of colours to choose from, so you could pick whichever best suits the timber you are using and where the finished project will be hanging. I applied two coats of Whitewash using a speed brush, or synthetic brush.
Step six: Cut your rope into four equal lengths and thread each length through the corner holes of your shelves starting from the bottom. Tie each length of rope into a knot on the underside of the bottom shelf, so the bottom shelf rests on these knots.
Step seven: Adjust the placement of your shelves until you get them evenly spaced. Make sure you allow room for the pots to sit in the shelves, and room for your plants to grow of course. I spaced my shelves at 200mm apart. Secure the undersides of your remaining shelves with cable ties, they are a good solution because they aren't hugely visible and they don't budge. Trim the long ends of the cable ties once in place.
Step eight: Add your pots and plants, and hang in your chosen spot. Make sure that you use hooks that can safely take the weight of your shelves.
DIY with pictures: www.curtainclean.co.nz...
🧩😏 Riddle me this, Neighbours…
I am an odd number. Take away a letter and I become even. What number am I?
Do you think you know the answer?
Want to stop seeing these in your newsfeed? No worries! Simply head here and click once on the Following button.

Loved Cat lost from Paradise Road, Napier! Posted on behalf
Please call the number in the photo if you see Spot. He is desperately missed by his family ❤️🐈💔 He is missing from Napier but could be anywhere as he has been known to hop in cars plus he has been missing 3 weeks now. NB there have been 2 potential sightings - the most likely sighting is Hyderabad Road near Northe Street

Scam Alert: Bank cold calls
ASB is warning customers about reports of cold calls from scammers claiming to be from ASB. These scammers are trying to obtain personal information, including usernames, dates of birth, and verification codes sent to your mobile phone.
🛡️ The "Caller Check" Test
If you get a call from someone claiming to be from ASB and you’re unsure, just ask them for a Caller Check. You will then be able to verify the call through the app.
Remember, banks will:
❌ Never ask for your banking passwords, PINs, or verification codes
❌ Never need to know your full credit card number – especially the CVC
❌ Never ask you to download software or remotely access your device
❌ Never ask you to purchase gift cards or transfer funds.
If you have received a phone call and think your account has been compromised, call ASB on 0800 ASB FRAUD (0800 272 372), or visit your local branch.

 Loading…